SAND ANIMATION 1. PLAYING IN PAIRS
SAND ANIMATION 2. EXPOSURE STRIP
SAND ANIMATION 3. MORPH - POSITIVE TO NEGATIVE
Set up your Dragonframe station, break out your tools and start animating in sand. Don't worry about content right now. Simply get used to making textures, patterns and simple images that move. Be sure to play with different techniques. Try using brushes, stencils, strainers, spreaders with various edge patterns, and even your fingers.
Studio Workflow: Follow these steps for set-up and work flow in the Downshooter lab:
A. Software and Physical Set-up: Work directly from your personal hard drive so you will have your original frames.
- Sign into the Workstation Check-sheet.
- Set up Dragonframe at 12 fps (Stop Motion Studio if you're working remotely).
- Pour sand into the Lightbox. Work back and forth between the camera position and the Lightbox to establish the parameters of your frame.
- Set your Dragonframe Composition Guide for 4:3.
B. Set up Exposure and Focus: Once you have a basic idea of your image and framing you can adjust your exposure and focus accordingly.
- Make sure the camera is set to M (Manual) and in Dragonframe, Auto White Balance is OFF, and ISO is 200 or less.
- Back-light (light-box), overhead lighting, and exposure settings (shutter speed, lens aperture and ISO) can be adjusted to change the contrast of your image.
- Use the Dragonframe Focus guide to set focus on the individual grains of sand. Use a small tab of gaffers tape across the lens focal ring to "lock in" your focus setting.
C. Play with the Sand: Take turns drawing in the sand and trying different ways to animate. . . and remember to have fun!
- Try piling, spreading and creating textures in the sand.
- Use any of the tools available, including our fingers.
- Make a shape in the center of the frame and play with moving it about the frame.
- If you're stuck the, try running through some of the principles of animation; Squash & Stretch, Arcs, Exaggeration, etc.
D. Clean up your work station
E. Post Final Animation:
- When you are finished scoop sand back into containers with small and broom and card stock.
- Put away any sand tools you've been using.
- Use a shop brush to clean up sand from entire work area including keyboard.
- Turn off Light-box and leave Camera on Downshooter.
- If needed leave comments in the Workstation Check-sheet
- Basecamp Dropbox
- Discord #sand-animation
Naming: simpsonB_sandPlay.mp4
Specs:
- 4:3 Aspect Ratio
- Animate in 1's @ 12 FPS
- 1440 x 1080 H264
- Sound is Optional

The Exposure Strip is a tool that you can use before you begin animating to get the best possible image for your animation. It will also help you to get familiar with exposure settings in Dragonframe and some of the lighting options you have available on the sand station. The ratio of back light to top light can have a significant affect on your final image. Some of the variables you'll want to nail down are as follows:
- You want to be working with the room lights off.
- How bright is the dimmer setting on the sand box?
- Will you be using any additional top light to add ambiance to your final image?
Setting up: Follow these steps below to set up your Downshooter for a sand shoot.
A. Software and Physical Set-up: Work directly from your personal hard drive so you will have your original frames. Go here for a guide on how to set up your hard drive with the appropriate Project Folder Structure.
- Sign into the Workstation Check-sheet.
- Set up Dragonframe at 12 fps (Stop Motion Studio if you're working remotely).
- Pour sand into the Lightbox. Work back and forth between the camera position and the Lightbox to establish the parameters of your frame.
- Set your Dragonframe Composition Guide for 4:3.
B. Create a Sand Image: The most useful approach is to build your Exposure Strip with an sand image based on a sequence that you will actually be animating. Jump down to the assignment below (SAND MORPH - POSITIVE TO NEGATIVE) and use the sand to create an image in frame that has a full range of darkness, light, and some nice variations in between.
C. Set up Exposure and Focus: Once you have a basic idea of your image and framing you can adjust your exposure and focus accordingly. Go here for a guide on how to set up your exposure correctly in Dragonframe.
- Make sure the camera is set to M (Manual)
- In Dragonframe , Auto White Balance is OFF, and ISO is 200 or less.
- Back-light (light-box), overhead lighting, and exposure settings (shutter speed, lens aperture and ISO) can be adjusted to change the contrast of your image.
- Use the Dragonframe Focus guide to set focus on the individual grains of sand. Use a small tab of gaffers tape across the lens focal ring to "lock in" your focus setting.
D. Create an Exposure Strip: Now that you have a base-line for your exposure, you're going to create an "Exposure Strip". This will allow you to choose the best possible exposure setting BEFORE you spend all that time animating.
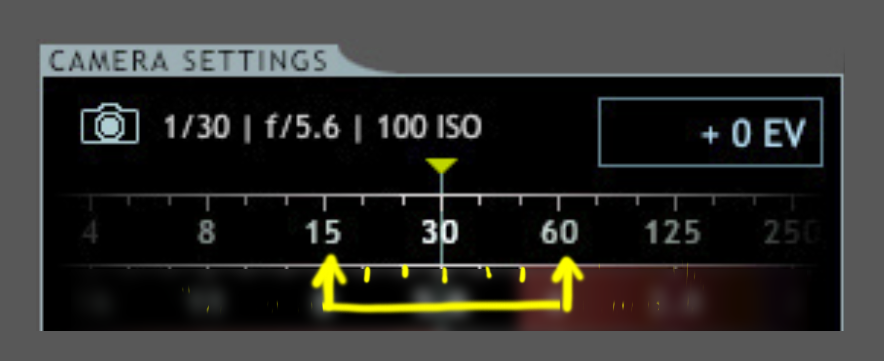
1. Adjust Exposure and Take your first "Test Shot": Starting from the base-line exposure from the last step, roll the shutter speed three segments to the right (if your base-line shutter speed is 30, you'll roll the Shutter Speed setting to 15). Take your first "Test Shot"
3. Adjust Exposure and Take Six More"Test Shots": Role the Shutter Speed one increment to the left and take your second "Test Shot". Repeat until you have seven images.
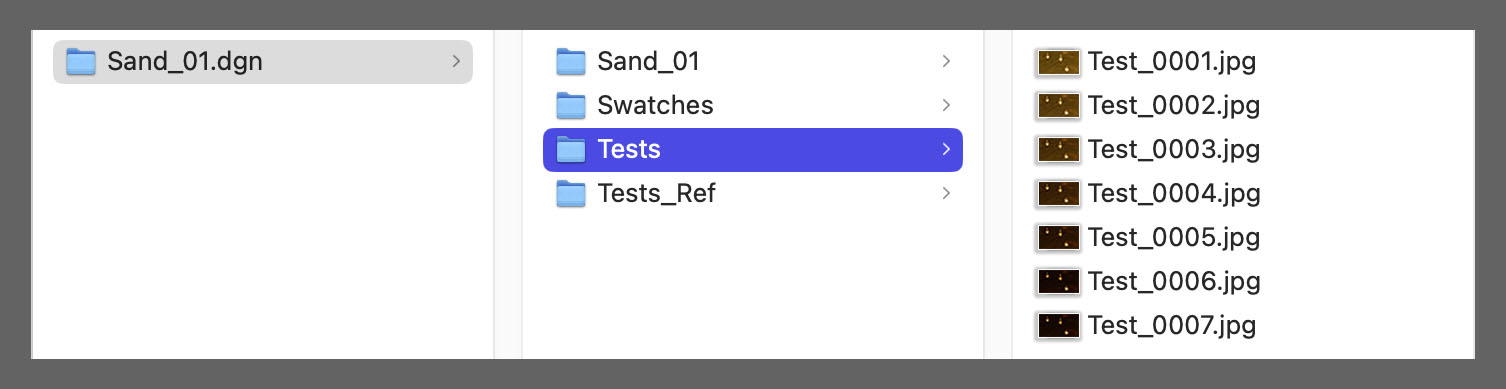
4. Harvest you Test Images from the Dragonframe Project "Test" Folder: Copy the Test Images directly from the "Tests" folder in Dragonframe and Paste them into an "Exposure Strip" folder in the 327 Projects Structure in your Hard Drive.
5. Name, Compress,& Submit Test Image Files: Name the folder before compressing it into a zip file. Then upload it to the 327 Basecamp Dropbox.
Naming: simpsonB_exposureStrip.zip

For the sand morph assignment you will begin with one simple positive morph target (dark against a white field), animate to a completely different morph target (still positive), and then animate to a negative version of your original morph target (white against dark field). Be sure to adjust the exposure on your test image to achieve a strong silhouette.
Reading Note: If you haven't yet, read Animating a Sandy Morph, a 12 step exercise (pp. 82-86 in Fluid Frames).
Studio Workflow: Follow these steps for set-up and work flow in the Downshooter lab:
A. Software and Physical Set-up: Work directly from your personal hard drive so you will have your original frames.
- Set up Dragonframe at 12 fps (Stop Motion Studio if you're working remotely).
- Pour sand into the Light-box Work back and forth between the camera position and the Light-box to establish the parameters of your frame.
- Set your Dragonframe Composition Guide for 4:3.
B. Created a Positive Morph Target: This should be a simple, recognizable shape with a strong silhouette.
- Compose a dark against the white background of the Light-box
- Leave plenty of negative space around your morph target. We can always punch in if we need to in post.
C. Set up Exposure and Focus: Once you have a basic idea of your image and framing you can adjust your exposure and focus accordingly.
- Make sure the camera is set to M (Manual) and in Dragonframe, Auto White Balance is OFF, and ISO is 200 or less.
- Back-light (light-box), overhead lighting, and exposure settings (shutter speed, lens aperture and ISO) can be adjusted to accomplish a strong contrast of your image.
- Use the Dragonframe Focus guide to set focus on the individual grains of sand. Use a small tab of gaffers tape across the lens focal ring to "lock in" your focus setting.
D. Evolving Hold (12 Frames): Use the following simple techniques to maintain subtle motion between frames keeping the sand "alive" for a one second evolving hold.
- Use your finger or paintbrush to lightly trace the edges of your image without changing the shape.
- Lightly pat textures or gently sprinkle additional grains of sand between frames.
- Gently tap the glass next to the image using the vibration to shift the sand.
E. Animate to Second Morph Target (12-24 frames): Animate away from your first target and land on your second. Still dark against the white background of the Light-box
- Plan out your animation with simple thumbnail sketches or simply trust the sand to take you to your next morph target.
- Think about basic animation principles like ease in & out, anticipation, arcs, and follow-through.
- Finish with a second Evolving Hold (12 frames)
F. Animate to Negative Morph Target (24 frames): Animate away from your second morph target towards a negative version of your original Morph Target.
- For this morph you will animate back to a version of your original morph target while changing the entire composition to a white image against a dark field.
- Try your best to land on a target image that closely resembles your original target in shape and scale.
- Similar to our first morph, you can opt to plan out your animation with thumbnails or simply trust the sand along with your sense of movement and composition.
- Finish with a second Evolving Hold (12 frames)
G. Clean up your work station:
- When you are finished scoop sand back into containers with small and broom and card stock.
- Put away any sand tools you've been using.
- Use a shop brush to clean up sand from entire work area including keyboard.
- Turn off Light-box and leave Camera on Downshooter.
- If needed leave comments in the Workstation Check-sheet.
H. Post Final Animation:
- Basecamp Dropbox.
- Discord #sand-animation
Naming: simpsonB_sandMorph.mp4
Specs:
Stephan Leeper/Central Michigan University 2026